Sunday, December 17, 2006

Buche de Noel

First buche de noel of the season! Chocolate-almond sponge cake rolled around raspberry buttercream and frosted with dark chocolate ganache. Decorated with meringue mushrooms, holly berries, buttercream snow, chocolate curl "leaves", and powdered sugar.


Read More...

Chocolate-Peppermint Cupcakes


Chocolate cake with a filling of mint chocolate ganache. Frosted with peppermint buttercream and sprinkled with candy cane bits.


An earlier prototype: mini chocolate cupcakes with mint buttercream. Decorated with chocolate peppermint bark.


My cupcake army. Mwahahaha!

Read More...

Sunday, November 26, 2006

Thanksgiving round-up: Apple Tart Tatin

The apple tart tatin was the pièce de résistance of the Thanksgiving dessert menu. This traditional french tart involves making a caramel and cooking apples in this sugar mixture until they are deeply caramelized, about 2 hours. Then pie dough or puff pastry is placed over the top, and the whole tart goes into the oven to finish baking. When it comes out, it's inverted and the result is a gorgeous presentation piece that also happens to taste amazing. The apples melt in your mouth, and without cinnamon or other spices to interfere with their flavor, this tart sings with a pure apple taste.


Apple Tart Tatin (makes 1-12" tart)
Ingredients:

  • 15 medium (or 10 large) Red Delicious apples, peeled, cored and chopped into quarters
  • 10 ounces butter
  • 1.75 cups granulated sugar
  • puff pastry or pie dough, rolled and ready to go: more on this below
  • Cast-iron skillet, or other oven-ready skillet, with high sides

Procedure:

In your skillet, heat the sugar over medium heat until it melts and starts to caramelize. Add the butter and stir, stir, stir until it combines. If your mixture never comes together or separates after coming together, try adding a little bit of cream or milk and stirring. Once the caramel is a beautiful butterscotch color, and somewhat thick, pull off the heat and let it stand and thicken and cool a bit. This is a great time to get your apples ready.

Once the apples are ready and the caramel is thick, place the apple quarters standing on end in the caramel. I like to make decorative concentric circles: place a ring of apples around the outside of the pan, then repeat with an inner ring and so on until no more space is left. Make sure the apples fit closely and that there is minimal space between them.

Cover with another skillet or aluminum foil and return to low heat. You are now going to cook the life out of these apples. Let them simmer on low for 1.5-2 hours. You'll want to check them every 20 minutes or so, and add new apples once spaces appear between them. I like to use an offset cake spatula for this task, to reduce the risk of getting burned by the caramel. I wedge my spatula between apples, work it back and forth to create space, and carefully place another apple between them. A table knife will work for this purpose as well. You'll do this for at least an hour, and it's nice to try and keep the original decorative shape when adding new apples.

After an hour and a half, it can go in the oven...but if you have extra time, let it cook for another half-hour, uncovered this time. You'll notice the apples getting very dark and soft. This is good.

When your time is up, remove the skillet from the heat and allow it to cool (this is for the safety of your poor fingertips). Once you can touch it without burning yourself, roll your pastry over the top, covering the apples completely. You want to have extra pastry hanging over the edges, because you're going to tuck it inside, between the apples and the skillet. When the tart is inverted, these will become the tart edges.

Place the whole thing in the oven and bake at 375 for 20-30 minutes, until the top is golden brown. Remove from the oven and allow to cool almost all the way. Invert while slightly warm and marvel at what you've made.

A note about the crust: my storebought puff pastry wasn't long enough to cover my 12" skillet, and I absolutely did not have time for homemade puff. So I whipped up a quick batch of this dough, one-and-a-halved. It was really really tasty, and I'm not just saying that because it was a last-minute addition. I might even prefer it to puff pastry, because it gives a little more body and sustance to the tart.

These instructions seem time-consuming, but it's not, I promise. It takes alot of cooking time, but it's easy to be baking other things and tend to the tart a few times an hour. I highly recommend this tart with spiced whipped cream: add 1/2 tsp cinnamon & a dash of nutmeg to your pint of cream before whipping it. Delicious!

On another note, I think maybe I should have a photo-labelling contest for the below picture. Would you really suspect it was an apple tart you were looking at?


Read More...

Thanksgiving round-up: Chocolate-Pecan Pie

Ooooh this was a good one. Pecan pie has never really done it for me, I think it's too sweet and too much like nuts suspended in corn syrup to really be exciting. However, adding melted dark chocolate and chunks of bittersweet chocolate to the mix made things really interesting. It was like a moist, chewy pecan brownie in a pie crust. And I meant that in the best way possible.


I used this recipe from epicurious, with a few modifications. I didn't use their pie crust recipe, and I blind baked my crust...in retrospect, that probably wasn't necessary and I might try it unbaked next time. I used 5.5 ounces dark (72%) chocolate melted in the mix, and added another 2 ounces of bittersweet chunks. Otherwise, I didn't make any modifications. The pie baked beautifully and was done after 55 minutes.

A close-up of the nuts and chocolate chunks:

Read More...

Thanksgiving round-up: Pumpkin Pie

I admit that pumpkin pie is not my favorite. I love pumpkin flavor in breads and other baked goods, but somehow that has never translated to pie love. I suspect it's a texture thing mostly, but I've never been too bothered, as Thanksgiving means plenty of other desserts to eat. However, I was very pleasantly surprised with my pumpkin pie this year. I actually liked it! It's got an amazing spiced flavor, and the texture was mousse-like and smooth, not gelatinous or goopy. This recipe is definitely a keeper.


Pumpkin Pie (makes 1-9")
Ingredients:

  • 2 cups canned or fresh pumpkin
  • 3 oz granulated sugar
  • 3 oz brown sugar
  • 1/2 tsp salt
  • 1/2 tsp ginger
  • 1/4 tsp cloves
  • 1/2 tsp cinnamon
  • 1/2 tsp nutmeg
  • 2 eggs
  • 1 egg yolk
  • 3/4 cup cream
  • 1/4 cup whole milk or half-and-half
  • 1/3 cup maple syrup
  • 1 tsp vanilla
Procedure:
Combine pumpkin and both sugars in a large mixing bowl on low speed. Add all spices and blend well. Add eggs and yolk until incorporated, then add vanilla, cream, milk, and maple syrup until well blended. Pour into prebaked pie crust and bake at 375 for 15 minutes, then at 325 for another 30-45 minutes, until center is mostly set but slightly jiggly in center. Overbaking is the bane of pumpkin pies, and causes them to crack.

No cracks at all! The pie crust was not my finest, but considering how many pies I had to bake at work this week, it's a wonder I was able to summon the mental fortitude to make pies in the first place.


Read More...

Thanksgiving round-up: Orange Rolls

Orange rolls are my family's traditional Thanksgiving bread of choice. I feel good including them on a dessert blog because with their sugar, butter, eggs, and sweet glaze, they're not quite in the healthy carb category. (But rest assured, they are in the tasty carb category). I always make extra for leftover turkey sandwiches.

Orange Rolls (makes 2 dozen)
Ingredients for rolls:

  • 1.5 cup milk, scalded
  • 1/3 cup sugar
  • 1/2 cup [1 square] butter
  • 1/4 tsp salt
  • 1 tbsp yeast
  • grated rind of 1 orange
  • 2 eggs, lightly beaten
  • 5 cups AP flour
  • 1/4 cup frozen orange juice concentrate

Ingredients for glaze:

  • 2 tbsp butter, softened
  • powdered sugar
  • orange juice

Procedure:

Place butter, sugar and salt in a large bowl, pour hot milk on top and stir. Let the mixture cool to lukewarm (about 105 degrees). Add the yeast and let it dissolve and bubble, about 10 minutes. Gently stir in the remaining ingredients, adjusting flour as necessary. Turn out onto floured cutting board and knead into a ball. (At this point, my dough is always sticky, but I find that if I add enough flour to smooth it out, they're too dry at the end. So a slightly sticky dough is fine). Place in a large greased bowl and let rise until doubled, about 2 hrs with regular yeast.

To form rolls: Punch down risen dough. Flour hands well, pinch off a large walnut-sized piece of dough, roll into a "snake" about 6 inches long, and tie into a knot. (Rolls can also be made into regular balls, knots are just traditional in my family.) Place on a lightly greased cookie sheet and let rise until doubled, about 45 min-1 hour. Bake at 400 degrees for 10 minutes.

Mix all the glaze ingredients together with an electric mixer, adjusting the sugar and orange juice to preference: the glaze should be runny but not as thin as water. Drizzle completely over the rolls while they are still warm.


Read More...

Thursday, November 23, 2006

Sugar High Friday: Ferrero Rocher truffles

My favorite sweet, hands down, is dark chocolate. So I was excited to hear that this month's Sugar High Friday theme was truffles, since it provided me with an excellent opportunity to play with chocolate. I recently bought a container of Royaltine ( very thin wafer shards used in some pastry and confectionery--the flavor is reminiscent of waffle cones) and was anxious to put it to good use.

I decided to create a recipe to mimic Ferrero Rocher chocolates--the gold-covered spheres containing whole hazelnuts, hazelnut-chocolate paste, wafer, and crushed nuts.

This recipe was a success in the sense that the resulting truffles tasted wonderful. But when judged against my original intent to create a confection that closely mirrored Ferrero Rocher chocolates, I have to say it could use a little more work.

I wasn't sure the best way to create the ganache itself. The Rocher candies have a semi-runny center that's basically Nutella paste. I was open to using Nutella, but I needed a stiffer chocolate for the outside so that I could roll the truffles. So I tried two different methods of creating hazelnut-chocolate ganache:

Test batch 1: 5 oz Gianduja chocolate (smooth milk chocolate mixed with hazelnut paste; strong hazelnut flavor) and 1 oz bittersweet chocolate, plus 1/3 cup cream

Test batch 2: 6 oz bittersweet chocolate, 1/3 cup cream, 1/2 cup Nutella

The batch with the Gianduja chocolate had an amazing flavor and was silky smooth in texture. However, the ganache never set firmly enough to roll, so next time I would have to reduce the cream or increase the bittersweet chocolate to give it body. The Nutella batch never matched the intense hazelnut flavor, and the Nutella created a stiffer, slightly grainy texture.

So ultimately I was left with two chocolate-hazelnut ganaches that were each lacking either the flavor or the texture I was seeking. Rather than starting over (Nutella doesn't grow on trees, after all!) I decided to work with what I had and create a hybrid candy using both. Thus, the knockoff Ferrero Rocher truffle was born.

Truffle cross section: whole hazelnut in the center, surrounded by silky hazelnut-chocolate paste and wafer flakes, enclosed by stiffer Nutella-chocolate ganache, rolled in chopped hazelnuts.

To assemble, I created thin discs of the stiffer Nutella-chocolate mixture. After shaping them I put them back in the fridge to firm up for another 5-10 minutes.

I spooned a dab of the delicious gianduja chocolate ganache into the center of my Nutella round.

Then the chocolate got a generous sprinkle of Royaltine wafer flakes. This was meant to mimic the wafer shell that encloses the Nutella in the Rocher candy. In the final product, though, the wafer was lost in all the chocolate. Next time I'll increase the wafer content.

A whole, toasted hazelnut was pressed in the center of the chocolate and wafers.


Then the outer chocolate was folded up and over, enclosing the center contents completely.


The resulting truffle was rolled in finely crushed hazelnuts.


Voila! As I said, you would never confuse them with original Rocher candies, but the combination of the different textures of the ganache, along with the wafers and the whole and chopped nuts, is really incredible. And in my opinion, you can never go wrong with hazelnut and chocolate.


Read More...

Sunday, November 05, 2006

Butterfly cake for a baby shower

My dear friend Holly is having a baby, and I was invited to make the cake for her shower. Of course, I jumped at the chance to make something special for the celebration. She asked for "something chocolate," so I decided to go with a chocolate layer cake, filled with ganache, raspberries, and whipped cream, and frosted with ganache. I chose a butterfly theme because the baby's nursery will have a butterfly crib, and is decorated with a brown and pink color scheme. The polka dots matched the invitations (plus, I thought they had a cute pop-art vibe). Full details and descriptions are below.


P.S. Welcome to new Sugar High Friday readers! Thanks for the lovely comments...I'll be by to check out your blogs soon. :)

Read More...

Butterfly cake: the metamorphosis

Creating a large layer cake is a labor of love, but you can do a few things to make it less labor and more love. Above all, make sure you have everything ready to go before you begin, and make sure you leave yourself enough time. There is nothing more frustrating than wrestling with unruly frosting and watching to clock tick down ominously to party time. I did the butterfly cake over several days, and, for the most part, it worked out beautifully.

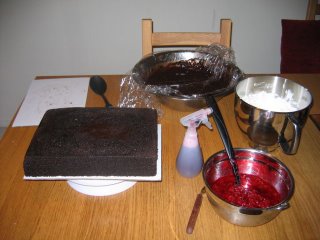
Below is my cake mise en place. You can see, clockwise from bottom left, the quarter-sheet chocolate cake, already layered and on the turntable, extra cardboard cake sheets, chocolate ganache, sweetened whipped cream, raspberries, and raspberry simple syrup in a squirt bottle. (The squirt bottle is a great secret: instead of applying simple syrup with a pastry brush, which can take FOREVER, put it in a clean bottle and spritz your layers with the syrup. Much faster, and I think the coverage is more even).


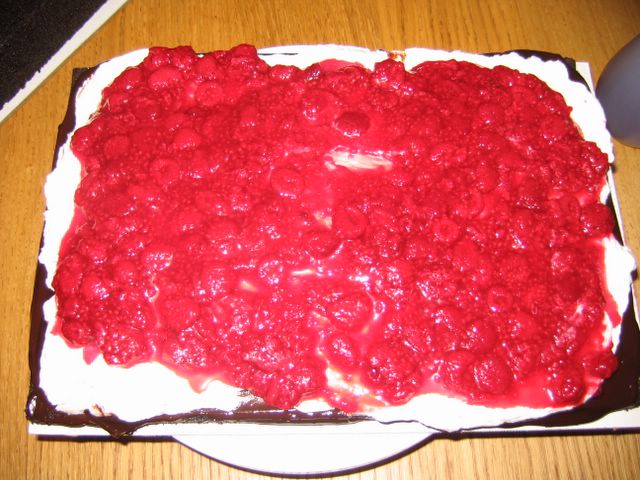
This is a washed-out photo of the first layer. Thanks, camera flash! You get the idea, though: chocolate cake, spritzed with raspberry simple syrup, chocolate ganache, whipped cream, and raspberries.


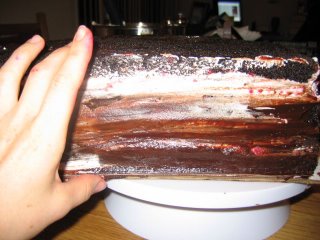
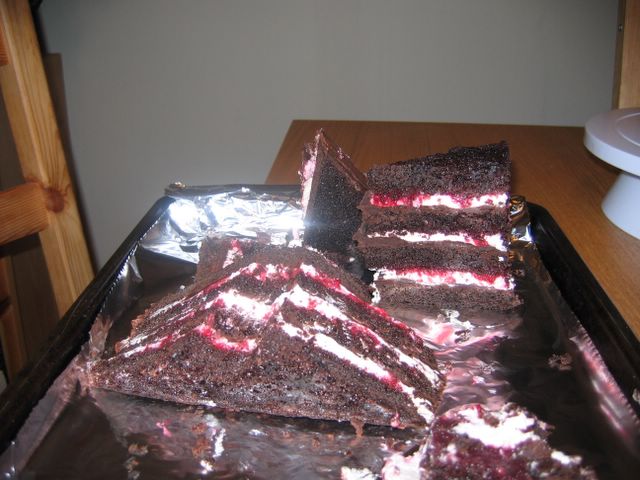
Lather, rinse and repeat. Four layers of cake and three layers of filling later, I had created a monster. It was over 5 inches high, and incredibly heavy. I wish I'd thought to stick it on the scale! Maybe ignorance is bliss, though...


I did all the layering in one evening, and then wrapped my baby tightly in saran and put it in the refrigerator overnight. The fridge isn't ideal, because it can make the cake dry (and can transmit funny smells), but what else is a busy working girl to do? The next evening, when I was ready to get serious and finish the cake, I put it in the freezer for about 30 minutes to really firm up. While it was chilling, I freehanded a butterfly pattern on a large sheet of paper, and cut it out. When the cake came out of the freezer, I placed the pattern on the cake and cut around it with a very sharp knife. Even though the cake was large and in charge, the pattern wasn't much of a problem, probably because it wasn't very detailed. Whew!


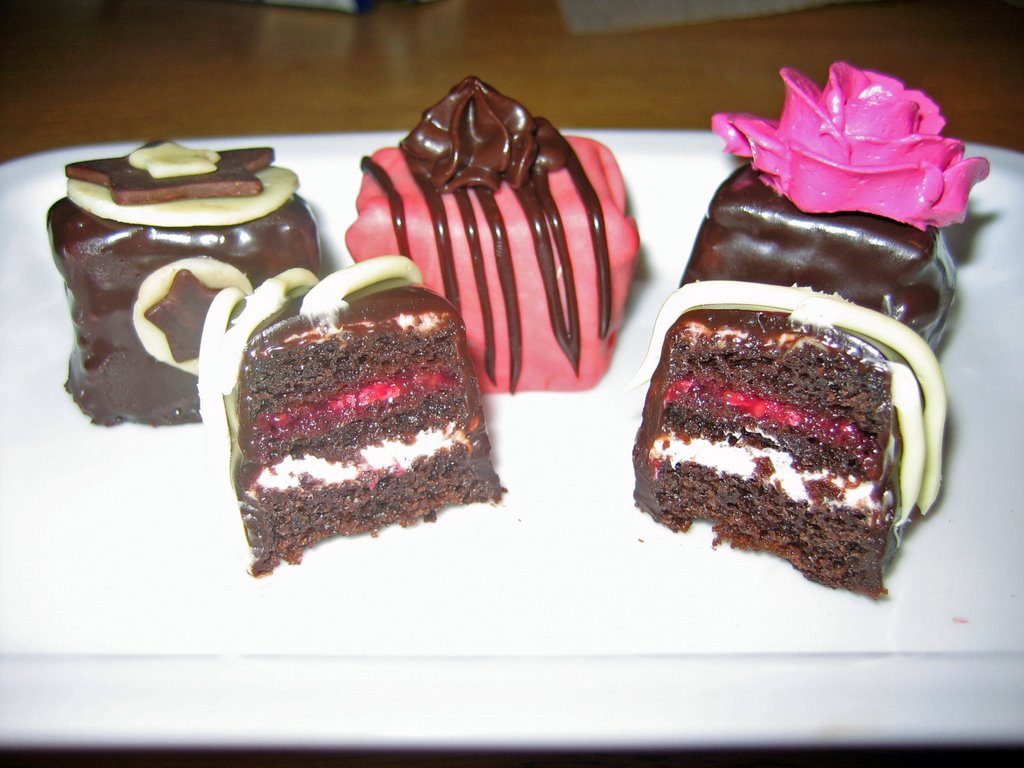
The worst best part of the sculpted cake idea? Cake scraps!


I gave my cake a quick crumb layer with the chocolate ganache and stuck it back in the freezer for another half-hour. I should mention at this point that I made the freakiest chocolate ganache ever. I made it one evening, and it was fine. Used it to frost between the cake layers, still fine. Wake up the next morning and it has completely broken. Broken, like it looked like chocolate tapioca. Perplexing and nasty. I don't know what happened, or what got into it, but I really didn't want to buy 5 more pounds of chocolate and start all over. So I heated it over a bain marie, added a bit more warm cream, and whisked the life out of it. Once it set it behaved better, but I don't think it ever truly recovered. So I had some difficulty smoothing out the ganache, but considering what I had to work with, I guess it's the best I could hope for!

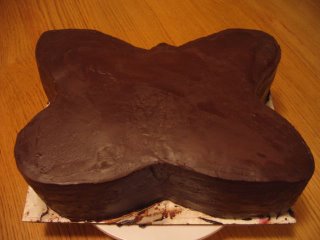
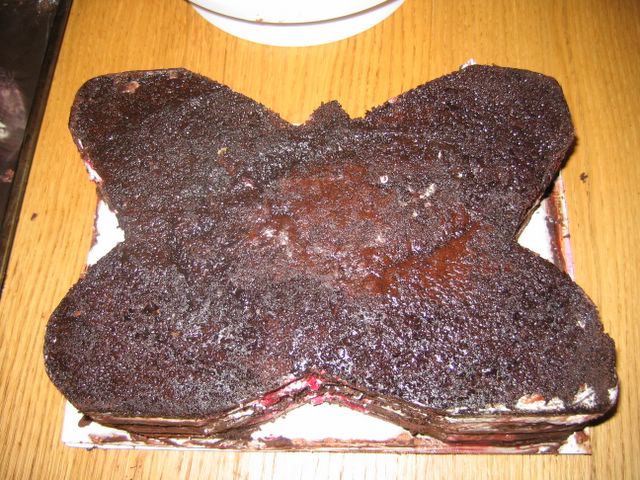
Anyhow--popped it out of the freezer, and frosted it smooth with chocolate ganache. The freezer step isn't necessary, but it is useful if you need to firm up your layers (so the cake doesn't fall apart as you're frosting) and it also helps the frosting to "set" quickly. If you're using a really loose buttercream or ganache, it can be useful to have a very cold cake, so that the frosting will firm up immediately on contact, and you don't have to worry about it sliding all over. So here is the finished cake. Notice how the cardboard underneath is all dirty? I actually cut out a cake board in the shape of a butterfly, and the cake is sitting right on top of that board--so I can easily lift it off the dirty board and put it on a clean one.


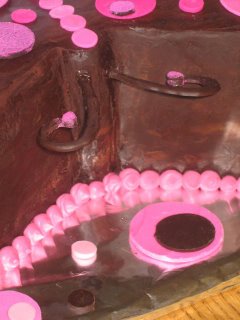
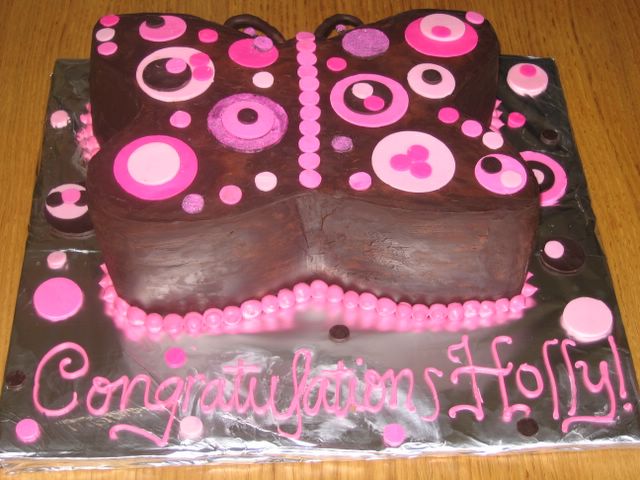
All that's left is to decorate! I used dark and white chocolate circle cutouts to create my pop-art butterfly. The chocolate was melted (and in the case of the white chocolate, tinted different shades of pink) and poured in a thin layer over foil. Once it was set but not brittle, I used fondant cutters to cut out circles of different sizes, let it harden completely, then popped the circles out and stored them in tupperware. I did this about a week in advance. The circles were attached using a small dab of melted chocolate.


I also used sparkling pink sugar on some of the dark chocolate circles. I was excited about the idea, but it didn't "pop" as much as I was hoping it would.


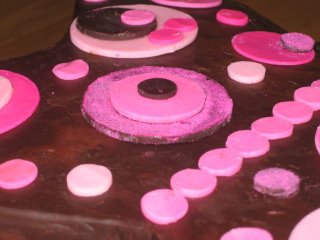
My antennae! I piped molding chocolate in antenna shapes and sprinkled the ends with pink sugar, then let it harden in the freezer. I wasn't sure they would stick in the cake, but the ganache hardened quite a bit, and it was super easy to skewer the cake. I painted melted chocolate around the insertion points just to be sure they wouldn't fall. Finished with some spiky balls of pink buttercream around the butterfly, wrote on the cakeboard, and voila! The butterfly, she is ready to eat.


Read More...

Sunday, October 22, 2006

Sugar High Friday: Petit Fours

This month's theme for Sugar High Friday, Petit Fours, perfectly dovetailed with a cake project I was already working on. Serendipity!


I used the leftover ends of a chocolate cake to make my petit fours. The cake was torted into four layers, and filled with whipped cream and raspberries.

I know it's hard to tell the scale, but the petit fours were approximately 1 inch high and not quite 2 inches long. Perfect for two big bites.

Some of the pieces were wrapped in plastic chocolate--either white chocolate dyed different colors, or dark chocolate--and some were covered in poured chocolate ganache. The decorations are mostly chocolate plastic cutouts, with a few melted chocolate and buttercream additions.


It was almost a shame to eat them. ALMOST.


Read More...

Tuesday, October 17, 2006

International Bread Day

To commemorate International Bread Day, I was hoping to make sourdough, or foccacia, or some other type of yummy yeasted dough. But the weekend was busy, and there wasn't much time after work to get dough going. So instead, I made a quick bread: Jalapeno-Corn Muffins. They were perfect with black bean chili on a cloudy October evening.

Read More...

Saturday, October 14, 2006

Pie pals

Q. What happens when you combine fatigue, boredom and lots of excess pie dough?
A. Pie pals! Coming soon to a bakery near you.


I find this little fella's smile particularly charming.

Read More...

Wednesday, October 11, 2006

Helloooo beautiful

Napoleon with coconut pastry cream, finished with mango puree and kiwi.

Read More...

Wednesday, October 04, 2006

Where is the love?

Work has me up to my hairnetted ears in apple pies right now. Although that sounds delicious, in actuality it is mostly just tedious. The saddest part is that apple pies, once one of my all-time favorites, have lost their appeal. The sight, the smell...even the thought of a fresh-baked apple pies is enough to trigger my gag reflex. Too many hours spent scooping up filling, too many blisters and aches from crimping crusts. Right now the smell of pies baking is the smell of exhaustion.

All of this is quite unfortunate, because apple pies are one of the staples of fall baking. Crisp, tart apples, heavy with aromatic spices like cinnamon and nutmeg, just a hint of lemon juice, baked in a flaky, golden crust with a crunchy layer of sugar on top...used to be heaven! I only hope I can regain my enthusiasm for pies soon, otherwise it'll be apple tart tatin at Thanksgiving this year!

Read More...

Sunday, October 01, 2006

Pâte à Choux

Pâte à choux (pronounced paht-ah-shoo) is the base dough for creating éclairs, profiteroles, and any number of their sweet and savory variations. It's a unique dough in that the leavening comes entirely from the eggs in the recipe and the steam created by water being trapped in the dough. Thus, it can rise to great heights, but if done improperly, tends to fall once removed from the oven. Pâte à choux might sound intimidating, but it's actually a simple recipe, and if followed correctly, you can impress everyone with homemade éclairs!

INGREDIENTS:
5 eggs
1/2 cup water
1/2 cup milk
7 TBS butter, chopped fine
1 TBS sugar
1 tsp salt
1-1/2 cup AP or bread flour
1 egg+1 yolk for egg wash

PROCEDURE:
1) Beat the egg and yolk together and reserve for the egg wash. Whisk together the remaining eggs, set aside for the batter.
2) Combine water, milk, butter, salt and sugar in saucepan. Bring to a boil until the butter and sugar have melted.
3) Remove pan from heat and add flour all at once. Stir until thoroughly mixed.
4) Return to heat and cook over med-high heat, beating constant and vigorously with a wooden spoon until a thin film forms on the bottom of the saucepan and the batter holds together in a mass in the center of the pan. This will take about 3 minutes.
5) Transfer to a mixing bowl. Beat on medium speed for about 2 minutes. In 4 additions, slowly stream in all but 1/2 of an egg, allowing each addition to be absorbed by the batter before the next. After you add each bit of egg, it will look like the batter has broken. Don't worry! It will come back together.
6) Stir until the batter is smooth, soft and shiny and sticks to your fingers. Add only as much of the beaten egg as necessary to achieve this consistency. Do not overwork the batter.
7) At this point you are ready to pipe or spoon the batter onto a cookie sheet lined with parchment paper. Fill a piping bag with the dough, or if you don't have a piping bag, fill a large Ziploc bag with dough and cut off a corner to create an opening to squeeze the dough through. For éclairs, pipe a line of dough about 3" long, holding the bag at a 45* angle. You can use either a large circle or a large star tip. For profiteroles, you can just use the bag opening, or use tip #4, 5, or 6 depending on how large you want your circles.
8) Brush the tops of your dough with the egg wash. Bake at 425* until golden (about 15 minutes) and then turn the heat down to 375* and bake for another 10-15 minutes. If the tops are looking very done, turn the heat even lower and open the door slightly during the last 10 minutes. It is very important that the dough gets cooked completely through, and dries out in the middle. Having damp dough is the number one reason éclairs tend to fall once removed from the oven. A long cooking time ensures that they are fully dried and won't collapse on themselves.

Now for the fun part! Assemble your éclairs by splitting them down the center and piping them with whipped cream, pastry cream, or chocolate cream. The tops can be dipped in chocolate or drizzled with chocolate, caramel, berry puree...whatever you want!


Or how about profiteroles? My favorite is to fill them with freshly made ice cream, but whipped cream also works well. Or how about fresh berries and a mixture of chocolate ganache and whipped cream?
If you're really ambitious, you can assemble your profiteroles into a croquembouche, the traditional wedding cake in France. But we'll leave that step-by-step for another lesson.

Read More...